 |
| From Peabody/ Vanderbilt link |
So many questions come each day. I disregard most of them; write some of them down. I thought maybe I could do a blog post each week (or middle season) collecting them.
1. When should I plant cucumbers in my area? Zucchinis? Is now too late? Can they grow in a "container" (like a big cloth planting bag that I grow my tomatoes in?
Cucumbers & Zucchini — Timing for Western Springs (Zone 5b)
Good news: it's not too late at all. You're actually in a sweet spot right now. Chicago/Zone 5b has an average last frost around April 7 and first fall frost around October 22, giving a roughly 198-day frost-free growing season. Both cucumbers and zucchini are warm-season crops that want to be planted after frost — and that window is wide open through mid-June. Lawnbyseason
Zucchini tolerates slightly cooler soil than cucumbers and can go in 5–7 days earlier, but both are fine to plant now. Direct-seeding cucumbers into warm soil (60°F+) actually works very well — direct sowing after the last frost rather than transplanting means cucumbers establish faster in warm soil. You have until roughly mid-July to get seeds in the ground and still expect a harvest before frost. BloomingExpertLawnbyseason
🛍️ Cloth Grow Bags — Yes, Absolutely!
Your tomato bags will work great. Cucumbers and zucchini are among the best choices for fabric grow bags, which promote air pruning, improve drainage, and prevent root circling. The Old Farmer's Almanac
Size matters though:
- Cucumbers: Vining and bush-type cucumbers can be grown in 10-gallon grow bags; providing a trellis for vining varieties will help maximize space and productivity. myBackyard
- Zucchini: Bigger is always better — at a bare minimum a 5-gallon container, but a 25-gallon fabric grow bag is a great option for happier plants and more fruit. Gardening Know How
One practical tip: container growing gives you more control — you can move the pot to get the most sun and choose fresh, clean potting soil, since many cucumber diseases are soil-borne. Also, for bushier bag-grown cucumbers, try pinching off the growing tip when the vines have formed six leaves, and feed with a balanced fertilizer every two to three weeks. The Old Farmer's AlmanacGardening Know How
2. My nasturtium is growing well. How can I eat it? (I've heard that I can!)
🌸 Eating Your Nasturtium
You heard right — and you're in luck because the whole plant is edible: flower buds, leaves, stems, and even the seeds. All parts have a distinct peppery flavor similar to radishes or mustard — strongest in the seeds and lightest in the flowers. RusticwiseAsk The Food Geek
Here are the most fun ways to use it:
- Flowers — use as a beautiful garnish on savory dishes and desserts, add whole or broken petals to salads for color and spice, or stuff them with cream cheese. Rusticwise
- Leaves — use in pasta dishes in place of baby spinach, either blanched or added raw to wilt from the heat, or use large leaves like grape leaves and stuff them. They also make a surprisingly good pesto. Plant Food At Home
- Seeds — once pickled, the seeds serve as a delightful alternative to capers, perfect for salads or brines for roasts — often called "poor man's capers." Use only the firm, young green ones. Savage Arms
- Infused vinegar — pack a jar with flowers, cover with white vinegar, wait 1–3 weeks, then strain and use in dressings.
3. What is the Frayer model?
📚 The Frayer Model
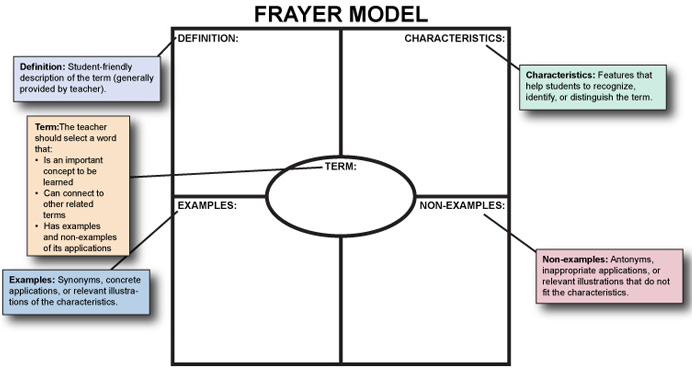
The Frayer Model is a graphic organizer used in education — primarily for vocabulary and concept learning. It was developed by Dorothy Frayer at the University of Wisconsin. A typical Frayer Model is a four-square diagram centered on a word or concept, with each quadrant containing:
- Definition — in your own words
- Characteristics — key attributes or features
- Examples — instances of the concept
- Non-examples — things that are not the concept (this is the distinctive part — it forces students to think about boundaries)
It's widely used in K–12 classrooms to build deep understanding of vocabulary rather than just memorizing definitions. The non-examples quadrant is what makes it particularly powerful for clarifying misconceptions.
✂️ 4. Pruning Shrubs
The timing depends on when the shrub blooms:
- Spring-blooming shrubs (lilacs, forsythia, azaleas) — prune right after they finish blooming, typically late May to early June in Chicago. They set next year's flower buds on old wood over summer, so pruning later removes those buds and you lose the flowers.
- Summer-blooming shrubs (Rose of Sharon, butterfly bush, panicle hydrangeas) — prune in early spring before new growth, typically late March to early April. They bloom on new wood.
- Evergreen shrubs and hedges — late June works well (after the first flush of growth hardens off), or early spring before growth begins.
- General shaping/size reduction — for non-blooming shrubs or ones where flowers don't matter to you, early spring (before leafout) is the most forgiving time because you can see the structure, and the plant will push vigorous new growth to cover cuts.
Since yours are "getting bulky," don't be shy — most established shrubs tolerate a hard cutback well in early spring. The one rule of thumb: never remove more than one-third of the plant in a single season.
🌱 5. Chicago Lawn Fertilizing Schedule
Here's a standard schedule for cool-season grass (Kentucky bluegrass, fescue, ryegrass — the typical Chicago lawn):
| Timing | Approximate Date | What & Why |
|---|---|---|
| Early Spring | Mid-April | Light application (low nitrogen) to green things up without pushing too much top growth |
| Late Spring | Late May–early June | Skip or use minimal fertilizer — grass is growing fast naturally; heavy nitrogen now stresses roots |
| Summer | Skip entirely | Heat stress + fertilizer = lawn damage. Just water. |
| Early Fall | Mid-September | Most important feeding — high nitrogen, helps recovery from summer and root development |
| Late Fall | Late October–early November | "Winterizer" application — feeds roots going into dormancy, green-up is faster next spring |
The fall feedings (September and October/November) are far more important than spring ones for Chicago lawns. Many lawn pros say if you only fertilize once, do it in early October. The landscapers you're seeing now (mid-June) are actually a bit late for the late-spring window — at this point it's often better to wait until September rather than fertilize in summer heat.
Reading a fertilizer bag — every bag has three numbers on it (called the N-P-K ratio): nitrogen, phosphorus, potassium. So a bag labeled 29-0-4 has 29% nitrogen, 0% phosphorus, 4% potassium. The first number is always nitrogen, which drives green leafy growth.
For the Chicago lawn schedule:
- Mid-April (light/low nitrogen) — look for something like a 20-0-8 or similar "balanced spring" fertilizer, applied at half the recommended rate. Some people use a "slow-release" formula so the nitrogen trickles out gradually rather than spiking growth all at once. Brands like Scotts Turf Builder Early Spring fits this window.
- Mid-September (high nitrogen) — this is your big feeding. Something like 32-0-10 or 46-0-0 (straight urea, very high nitrogen). Scotts Turf Builder or Milorganite (12-0-0, organic and slower release) are popular choices. Apply at the full recommended rate.
- Late October "Winterizer" — these are specifically formulated products, often labeled exactly as "Winterizer." Typically around 32-0-10 or 30-0-12 — still high nitrogen but with more potassium, which helps root hardiness going into winter. Scotts Turf Builder WinterGuard is the classic example.
🪵 6. Filling Gaps Between Trim and Drywall
This is one of those finishing tasks where the right technique makes a huge difference in the final look. A few tips:
Use the right product for the right gap:
- Small gaps (under ⅛") — paintable latex caulk is your best friend. It's flexible, paintable, and forgiving. This is the standard choice for trim-to-drywall gaps.
- Slightly larger gaps (⅛" to ¼") — fill with lightweight spackle or joint compound first, let it dry, then caulk over it. Caulk alone will sink into larger gaps.
- Larger voids — use a foam backer rod (a flexible foam rope from any hardware store) stuffed into the gap first, then caulk over it. This gives the caulk something to bond to and prevents it from cracking.
Application tips:
- Cut your caulk tube at a very shallow angle (almost parallel to the tube) to get a small, controlled bead. A tiny opening gives you much more control than a wide one.
- Keep a small cup of water and your finger nearby — dip your finger and smooth the bead immediately after laying it. This presses caulk into the gap and leaves a clean, slightly concave profile.
- Tape is optional but helpful for beginners: apply painter's tape on both sides of the gap, caulk, smooth, then pull the tape immediately while the caulk is still wet. It gives you crisp lines.
- Don't try to do too long a run at once — work in 2–3 foot sections before smoothing, especially in a warm basement where caulk can skin over quickly.
Don't skip this step: Let caulk fully dry before painting. Most latex caulks say 1 hour but 24 hours gives a much better result, especially if you're painting over it — wet caulk can wrinkle under paint.
One common mistake: People over-fill gaps and create a raised bead that stands proud of the trim face. You want the caulk slightly recessed or flush — once painted, gaps virtually disappear, but a fat bead of caulk actually draws the eye to the imperfection.

No comments:
Post a Comment